
How to Measure Sticker Size:
The Ultimate Measuring Guide
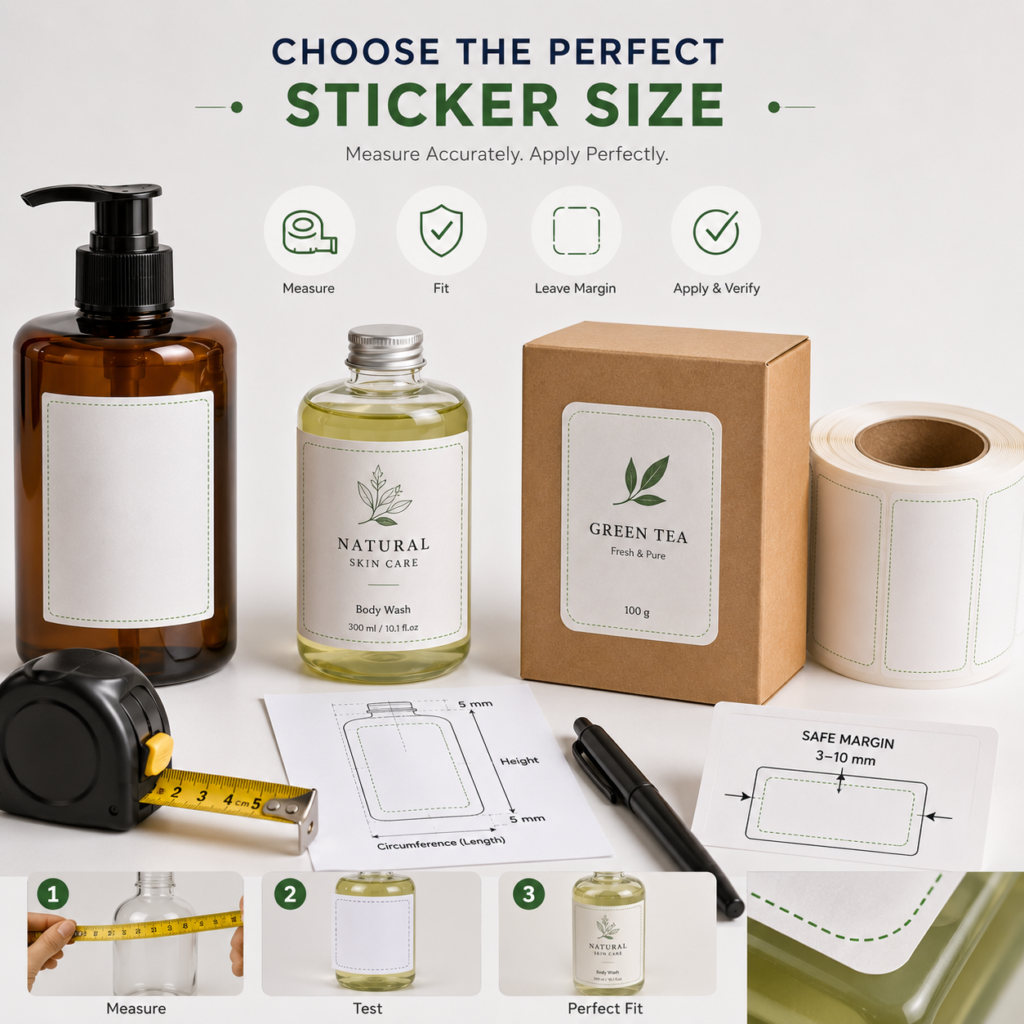
Self-adhesive stickers play an important role in the modern product production, distribution, and consumption chain.The sticker size fit of the label directly determines its aesthetic appeal, adhesion, and practicality.
However, many companies lack the practical expertise on how to measure sticker sizes accurately for complex container profiles.This often leads to measurement errors, blindly choosing ready-made labels, ignoring labeling safety margins, and not understanding how to measure irregularly shaped bottles.
This results in frequent problems such as sticker peeling, misalignment, packaging discrepancies, and finished product scrap.This article is designed for brand clients with no prior experience, providing a helpful guide to measurement methods and avoiding common pitfalls.
It offers a one-stop size selection solution for various bottle and cardboard packaging businesses, reducing the error rate in sticker customization.
How to Measure Sticker Size: A Step-by-Step Measuring Guide
Pre-measurement Tools
Prepare a ruler or tape measure, A4 paper, and a marker before measuring.
These tools are generally sufficient to measure the dimensions of all round, curved, square, and irregularly shaped bottles, paper packaging boxes, and metal cans available on the market.
Start Measuring Packaging Dimensions
Step-by-Step Measurement of Flat Packaging (Paper Boxes/Square Cans/Flat Gift Boxes)
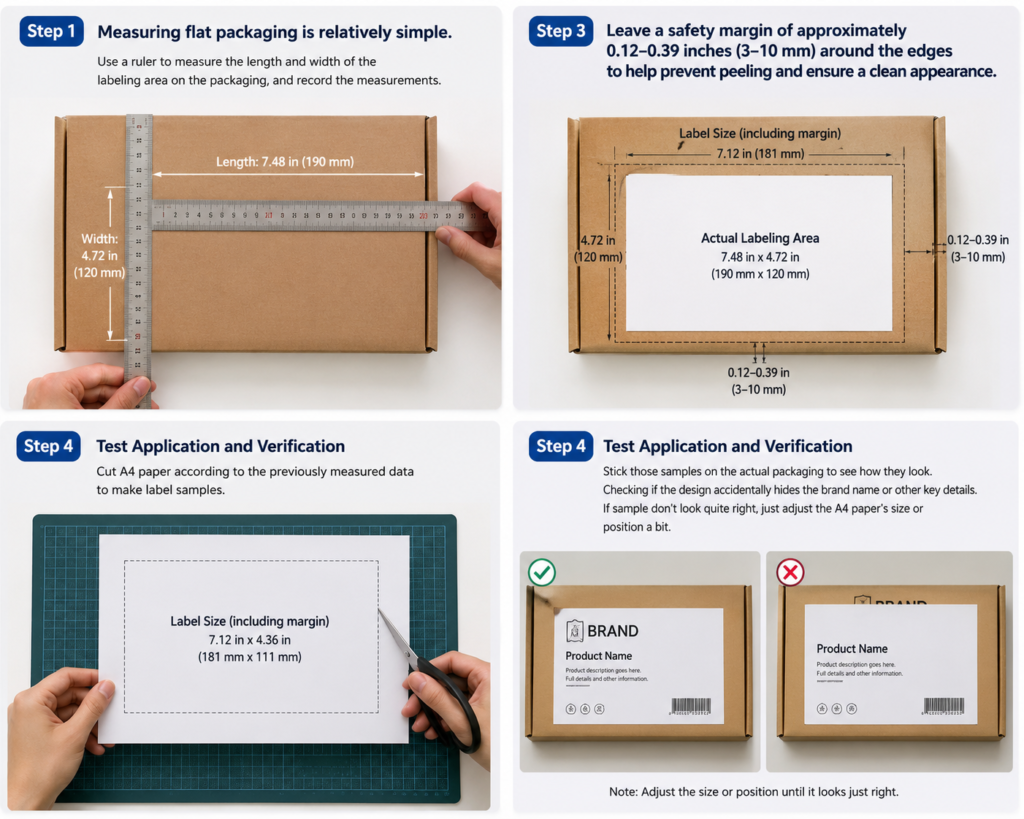
- Step 1:Compared to complex containers, learning how to measure sticker size for flat packaging is relatively simple. We just determine the precise engineering area where the label will be applied.
- Step 2:Use a ruler to measure the length and width of the labeling area on the packaging, and record the measurements.
- Step3:Leave a safety margin of approximately 0.12–0.39 inches (3–10 mm) around the edges to help prevent peeling and ensure a clean appearance.
| Max Printable / Labeling Area | Recommended Label Size (Approx.) |
|---|---|
| 100 × 80 mm | 80 × 60 mm |
| 150 × 100 mm | 120 × 80 mm |
| 200 × 150 mm | 160 × 120 mm |
- Step 4: Test Application and VerificationCut A4 paper according to the previously measured data to make label samples.Stick those samples on the actual packaging to see how they look.
Checking if the design accidentally hides the brand name or other key details. If sample don’t look quite right, just adjust the A4 paper’s size or position a bit.
Step-by-Step Measurement for Curved/Irregularly Shaped Bottles
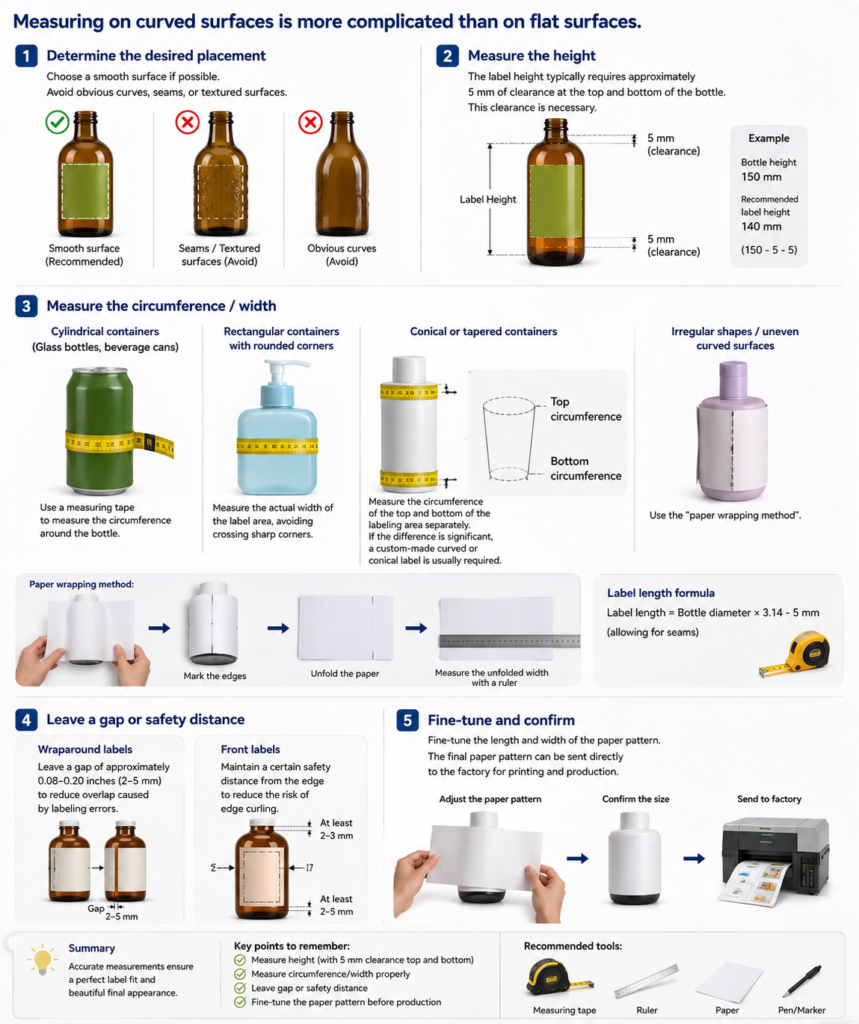
- Step 1: Master the fundamentals of how to measure sticker size. Anyone can gauge a flat area, but measuring on curved surfaces is far more complicated than on flat surfaces.
First, determine the desired placement, choosing a smooth surface if possible. Avoid obvious curves, seams, or textured surfaces. - Step 2: Measure the height. The label height typically requires approximately 5mm of clearance at the top and bottom of the bottle.
This is because the label cannot fit perfectly to the very top and bottom of the bottle; this clearance is necessary. - Step 3: Measure the circumference.
Cylindrical containers ( glass bottles, beverage cans): Use a measuring tape to measure the circumference around the bottle.
Rectangular containers with rounded corners: Measure the actual width of the label area, avoiding crossing sharp corners.
Conical or tapered containers: Measure the circumference of the top and bottom of the labeling area separately.
If the difference is significant, a custom-made curved or conical label is usually required instead of a standard rectangular label.
Label length = Bottle diameter × 3.14 – 5 mm (allowing for seams).
Irregular Shapes/Uneven Curved Surfaces: If the bottle shape is unusual and the circumference cannot be measured directly,we can use the “paper wrapping method”.
Cut a piece of paper and wrap it around the curved surface, marking the edges.
Unfold the paper flat and measure the unfolded width with a ruler. - Step 4: For wraparound labels, it is generally recommended not to completely close the wrap, leaving a gap of approximately 0.08–0.20 inches (2–5 mm) to reduce overlap caused by labeling errors.
For front labels, it is recommended to maintain a certain safety distance from the edge to reduce the risk of edge curling. - Step 5: Fine-tune the length and width of the paper pattern.The final paper pattern can be sent directly to the factory for printing and production.
Note: For all curved packaging, do not customize stickers based on the largest can size.
A physical test must be conducted using printed paper.
Relying solely on measuring tape can easily result in oversized dimensions or improper adhesion.
Pro-Tips: Avoiding Common Sticker Sizing Mistakes Before Printing
Flagging on Stickers: Causes and Prevention
Have you ever encountered a situation where the four corners of a sticker curl upwards after application? This is actually the most common problem caused by improper sizing and a lack of technical knowledge on how to measure sticker size for non-flat surfaces.
The causes fall into two categories:
- First, the sticker is too large. When the corners are pressed into the curved edges of the packaging, the adhesive rebounds under pressure, gradually causing the corners to curl and detach.
- Second, rigid film stickers are used on curved bottles, and the length and width are not adjusted for shrinkage. The material tension pulls the corners, causing them to curl.
High-risk scenarios: Stickers on round bottles without margins, and oversized stickers on right-angled cardboard boxes.
Prevention methods: Reduce the size of curved stickers by 3%-5%, and prioritize rounding the corners to significantly reduce the probability of curling.
Why leave a 1/8-inch safety margin?
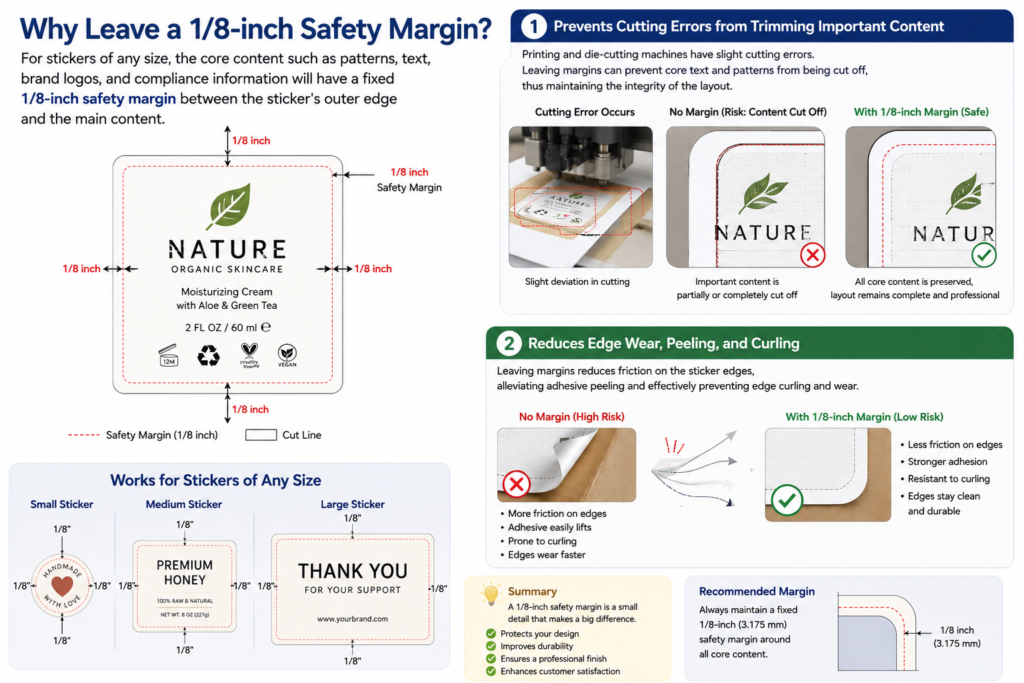
Please note that for stickers of any size, the core content such as patterns, text, brand logos, and compliance information will have a fixed 1/8-inch safety margin between the sticker’s outer edge and the main content.
The reason is that printing and die-cutting machines have slight cutting errors. Leaving margins can prevent core text and patterns from being cut off, thus maintaining the integrity of the layout.
On the other hand, leaving margins reduces friction on the sticker edges, alleviating adhesive peeling and effectively preventing edge curling and wear.
Other common size misconceptions:
When evaluating how to measure sticker size, you must look beyond basic dimensions.
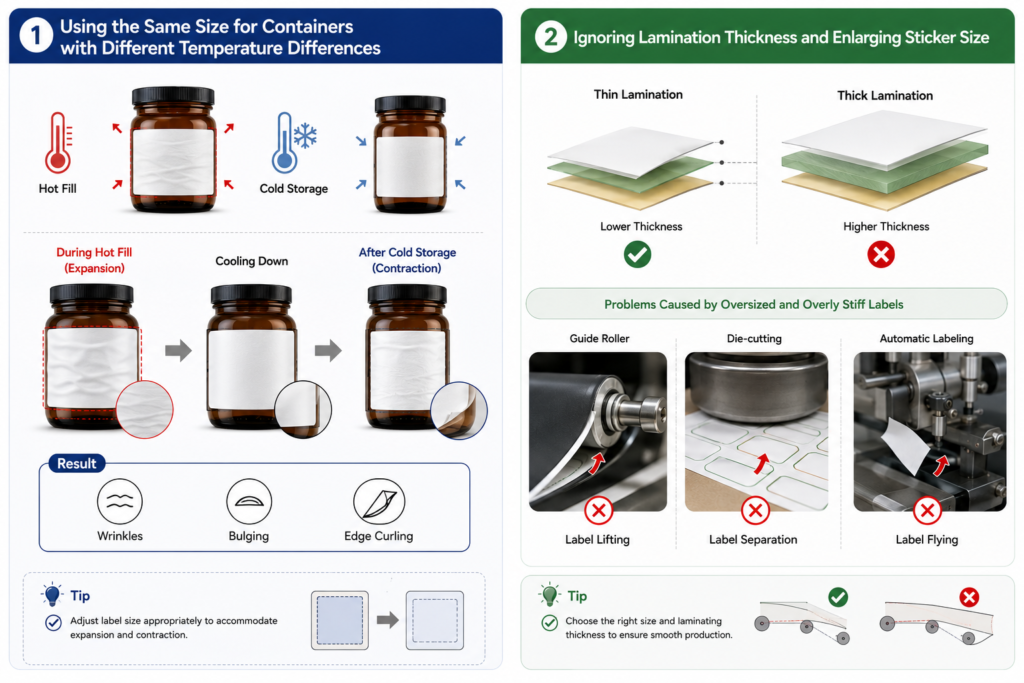
Using the same size for containers with different temperature differences: Because the coefficients of thermal expansion and contraction of the label material and the container material are different.
When the container is filled with hot products and expands, or rapidly contracts in a low-temperature warehouse, the label cannot keep pace with the bottle’s expansion.
This stretching can cause wrinkles, bulging, and even edge curling after cooling from high temperatures.
Ignoring the thickness of the laminating material and enlarging the sticker size: The thickness, density, and stiffness of the laminated label paper will increase accordingly.
If the sticker size is large and the stiffness is too high, the label can easily separate from the backing paper when passing through a smaller diameter guide roller or during die-cutting waste removal.
This can lead to frequent label drops or “flying” during automatic labeling and paper feeding.
All of the above actions will lead to labeling failure. Before finalizing the dimensions, the factory should be informed of the packaging material and storage environment to assist in verifying the reasonableness of the dimensions.
Why Ordering Custom-Cut Stickers from a Factory Beats Standard Sizes
Commercially available stickers have fixed sticker sizes and rigid designs, only compatible with standard bottles and jars.
They cannot accommodate customized, uniquely shaped honey jars, curved essential oil bottles, or custom-designed gift boxes.
Fixed-size stickers are either too large with curled edges or too small with excessive white space, resulting in a cheap-looking packaging.
Factory customization offers unlimited customization based on the data and requirements provided by the merchant.
However, layout must accommodate sticker sizes, forcing the removal of brand elements and compression of compliant text.
Factory-customized sticker sizes have adjustable length and width ratios, perfectly matching the proportions of the brand’s design drafts.
Without compromising on the design, you can create unique brand packaging with distinctiveness, differentiating yourself from homogenized, low-priced products.
Unlike commercially available pre-made stickers that only support basic printing.
Factory printing typically includes subsequent processes such as adjusting rounded corners, partial hot stamping, embossing, and custom lamination.
Customized sizes can be adjusted in tandem with the processing, and you can freely choose between paper/BOPP/PET film materials.
The corner design is optimized by combining size, taking into account both size fit and material texture.
FAQ
How do I measure curved packaging like bottles, jars, or squeezable tubes?
Use a flexible measuring tape or wrap a strip of paper around the container and mark the overlap points, then lay it flat to measure with a ruler. For cylindrical bottles, ensure you leave a 1/8″ to 1/4″ (3–6mm) gap between the label ends to prevent overlap misalignments during high-speed machine application.
Should sticker dimensions be stated as Width × Height or Height × Width?
In the printing industry, standard dimensions are always written as Width × Height (W × H) based on how the sticker orientates when facing you. Clarifying W × Height is especially critical for roll labels to ensure the unwind direction matches your automated labeling machinery.
How do I determine the correct sticker size for custom die-cut or irregular shapes?
Die-cut stickers are measured by their outermost bounding box—the maximum total width and maximum total height at their widest points. When submitting artwork files, provide vector dielines (in AI or PDF format) so our pre-press team can verify precise cut lines and bleed areas.
What amount of bleed area and safety margin should I leave in my label artwork?
We recommend a minimum 1/16″ (1.5mm) to 1/8″ (3mm) bleed margin beyond the cut line to prevent white edges during high-speed die-cutting. Keep all critical graphics and text at least 1/16″ (1.5mm) inside the cut line (safety zone).
How do roll label core size and unwind direction affect sticker measurements?
While label size dictates the sticker itself, machine applicators require exact roll specifications, including core diameter (typically 1″ or 3″) and outer roll diameter. Additionally, label width across the web determines roll direction and applicator setup.
What is the tolerance range for custom die-cut label sizes during mass production?
Our standard manufacturing cutting tolerance is ±0.5mm (±0.02 inches). This industrial precision ensures your roll labels or die-cut sheets fit seamlessly onto automated labeling lines without jamming or shifting position.
Can I request custom physical proofs or printable PDF templates to test sizes?
Yes! We strongly recommend printing a 100% scale 1:1 PDF template or requesting physical pre-production samples to test fit on your actual bottles, boxes, or pouches before placing a full production order.
Are sticker measurements handled in Inches or Millimeters for international orders?
We accept both Imperial (Inches) and Metric (Millimeters/Centimeters) units. For maximum accuracy in custom OEM/ODM packaging manufacturing, decimal inches or exact millimeter dimensions are preferred.

Need Help Customizing Your Own Packaging Design?
Whether you need Cosmetic Labels, Wine Labels, Food Labels, or Custom Adhesive Stickers, our experts can recommend the best material based on your product, application, and budget.